Beginner tutorial: Why enter a negative value for arc radius

Some CAD novices may wonder why the system sometimes asks them to enter a negative value for radius of an arc.

If users know two end points and radius when drawing arcs, and there are more than one arc that meets the condition, there are four actually, shown as below,

There are two arcs on both sides of the line segment defined by two end points: the arc that is smaller than 180° is called minor arc while the arc greater than 180° is called major arc.

The negative and positive values for radius are to solve this particular problem in CAD drafting, and we can control the drawing of major arc or minor arc by entering positive values or negative values for radius. But this is not to say that entering positive values is to get major arcs or entering negative values minor arcs, it all depends on the circumstances.

As we can see in the picture that there are four arcs meeting the condition, when we draw arc using start point, endpoint point and radius, we can switch direction by pressing CTRL. The clockwise or counterclockwise of arc segments is determined by the order of specifying start and end point, if we want to switch the direction, just CTRL, shown as below,

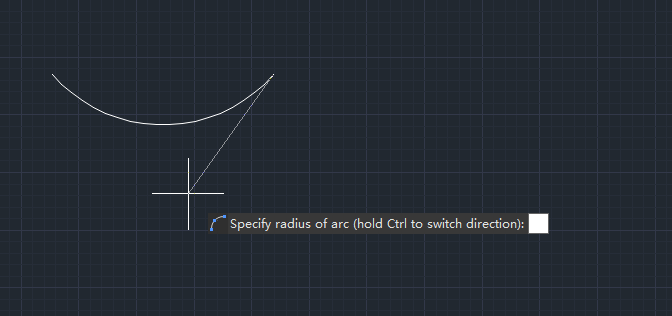
By default, the CAD system creates minor arc, if the direction is correct, entering a positive radius value creates minor arc segment and entering a negative radius value creates major arc segment.

If the direction is not correct, just press CTRL key to switch direction, then entering a positive radius value creates major arc segment and entering a negative raius value creates minor arc segment, shown as below,

GstarCAD Blog

www.gstarcad.net

Related Posts

GstarCAD 2026 DWG Comparison: Boost Design Efficiency

GstarCAD 2026 has introduced a new DWG Compare tool designed to eliminate the manual effort of identifying revisions between drawing versions. By using the COMPARE command, the software automatically highlights additions in red, deletions in green, and identical elements in gray using revision clouds. This feature streamlines the proofreading process for architects and engineers, allowing for instant visual verification of changes across any DWG file.

How to Calculate CAD Area Quickly?

As a CAD designer, are you frustrated by the cumbersome and error-prone manual CAD area calculation? GstarCAD offers multiple efficient CAD area calculation methods!

Leave a Reply

Don't Miss out

Gstarsoft Showcases Integrated CAD + BIM Solutions at BIM World Paris 2026

  • April 3, 2026
Gstarsoft Showcases Integrated CAD + BIM Solutions at BIM World Paris 2026

Boost CAD Productivity with GstarCAD 2026’s XTP Import Feature

  • March 24, 2026
Boost CAD Productivity with GstarCAD 2026’s XTP Import Feature

Case study: How TopenTech Optimized Equipment Diagnostics and Field Productivity with GstarCAD

  • March 9, 2026
Case study: How TopenTech Optimized Equipment Diagnostics and Field Productivity with GstarCAD

The Ultimate Guide to GstarCAD Mechanical 2026: The Future of Manufacturing Design

  • January 30, 2026
The Ultimate Guide to GstarCAD Mechanical 2026: The Future of Manufacturing Design

GstarCAD 2026 DWG Comparison: Boost Design Efficiency

  • January 16, 2026
GstarCAD 2026 DWG Comparison: Boost Design Efficiency

How to Calculate CAD Area Quickly?

  • December 25, 2025
How to Calculate CAD Area Quickly?

Discover more from Gstarsoft's Blog

Subscribe now to keep reading and get access to the full archive.

Continue reading