The settings for Plot Options in your drawing already begins when you start drawing.
If you need to have a drawing plotted, then think before you actually start drawing about things like paper size, plot scale, text height, lineweight, color, etc.
Or you may encouter some problems, for instance, the required text height is 3 mm, so you just set the text height to 3 mm, but since the required plot scale is 1:100, so the plotted text will be 100 smaller and are not legible at all; to make sure the plotted text is correct, we need to set text height to 300.

Steps by step tutorial to plot your drawing
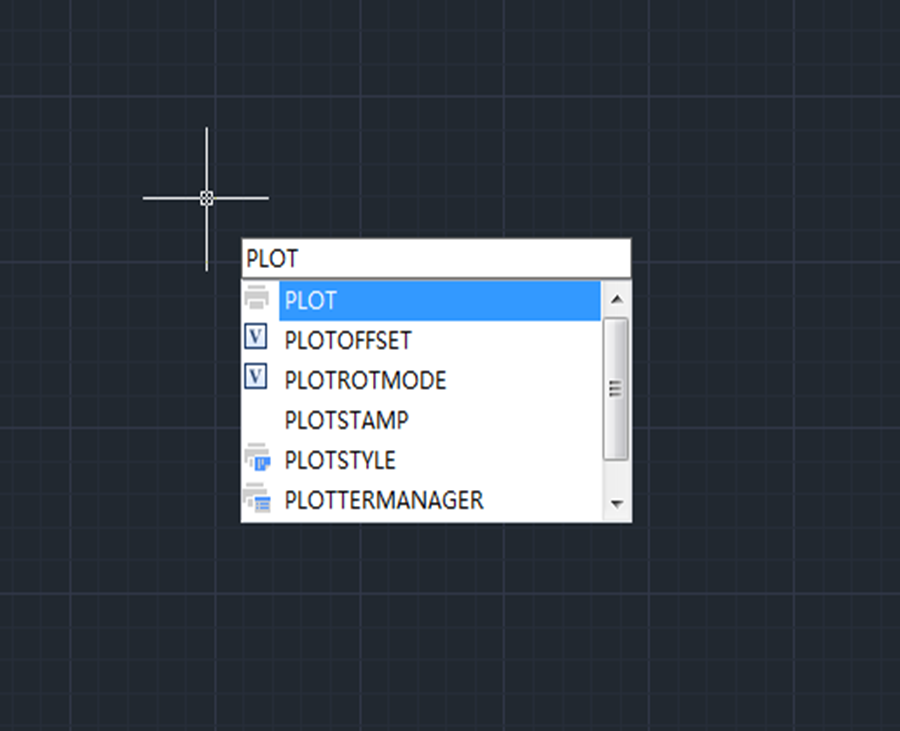
We can execute Plot by either inputting PLOT command or Click Plot button in the Quick Access toolbar to open the Plot dialog box,

1. Select Printer/Plotter
The first step is to select a system printer/plotter to plot out your current layout or sheet or export the drawing to files such as PDF, JPG, etc.

2. Select Paper
After we’ve selected a printer/plotter, all supported paper sizes will be listed from the drop-menu of Paper size. We would normally select a standard paper size, but we can also customize the paper size to meet various needs.
User should decide the paper size right before we start drawing, because we usually select drawing border, text height and dimension style accordingly.
Another kind reminder is that you may want to plot your large drawing using A4 paper just to test whether the plot can come out as it is.

3. Specify the Plot area
The plot area is the portion of the drawing to be plotted. There are four options for what to plot:

Display: Display is the default option, which plots all objects displayed in the drawing area.
Limits: This option is only available from Model tab, which plots or prints the current grid limits.
Extents: Plots all objects in the drawing.
Window: This options allows you to plot objects in the area you define, so after you select this option, you’ll be asked to specify first corner and opposite corner to define the area. You can also click the Window button to edit the defined area.

4. Set the Plot scale
The settings would be easy if you just want to use an A4 paper to test, just check the box before “Fit to paper” and the CAD system would automatically calculate the plot scale according to the drawing and the paper size.

To officially plot a drawing, we need to set the plot scale according to preset requirements such as 1:100 or 1:1.
There is a small preview of what to be plotted so that we can check our plot results, shown in the above picture.
5. Set the Plot style
If we don’t have special requirements for the plotted color or lineweight, you can skip setting it.
Select a plot style from the drop down list from “Plot style table” , shown as below,

6. Plot Preview
We’d bad preview the drawing before actually plotting it. We can zoom in/out or pan the drawing in the preview window to have a closer look at the details such as the text, lineweight, etc. and see whether they can be plotted.


7. Save
Click the “Apply to Layout” button before plotting will save your settings to the current drawing, so you won’t have to do the same setting the next time you plot.

Check the settings and then click OK to start plotting.
Join our discord community!
Connect with CAD experts, share technical insights, and get real-time support from the global community.
Join Discord ServerShare & Get a $10 Amazon Gift Card
Share your honest GstarCAD feedback and get a chance to win a $10 Amazon gift card.
Write a ReviewDiscover more from Gstarsoft's Blog
Subscribe to get the latest posts sent to your email.


